New Features in Version 2.0
Data Persistence
If you close the HikeTracker 2.0 app while recording a track, whether intentionally or accidentally or (heaven forbid) due to a crash, the app will pick right up where it left off the next time you open it. This is the expected behavior for iOS apps - consider this an apology for its being missing from earlier versions; the app is no longer such a nag about saving, as you have to intentionally close a track to get rid of it.
Spacing and Elevation Handling
If you have waded through any of the blog posts listed on the main HikeTracker Help page then you know that the principal way that the app counteracts the inherent GPS errors that affect slow-moving users is by spacing out the saved trackpoints in a way that takes the horizontal GPS errors into account - basically it requires a new point to be well outside what we might call the "circle of uncertainty" that surrounds the previous saved point
Together with some averaging, that spacing produces smooth-looking tracks and excellent distances.
But elevation is another story. In absolute terms, the vertical errors are similar to the horizontal ones but a hiker's elevation changes a lot more slowly than their forward progress - 1000 feet of elevation gain is a much bigger deal than 1000 feet on the level, for example.
So if we waited until a significant elevation change had occurred before saving a point we might have huge distances between points and a very crude track, indeed. HikeTracker now implements a combination strategy:
- Horizontal errors still govern the spacing of the saved points,
- but when a significant elevation change occurs, HikeTracker goes back and gently massages the elevations of the intervening points to keep them in line with the overall rate of elevation gain.
The Bull's Eye Button
On the Map Scene, the button near the lower right corner of the map used to be an X, as in "X marks the spot", and is now a "bullseye" character: ◎ and has two uses:
- A simple tap will force the app to save the next point that the GPS provides, whether or not it satisfies the usual spacing requirements. You can use this to mark any point that is special and you think might otherwise be skipped - a sharp corner (such as a switchback), a high or low point or whatever you please. You would do this only in cases where you are trying to make an especially lovely track to save and treasure; it will have only the slightest effect, or none, on distances and elevation gains.
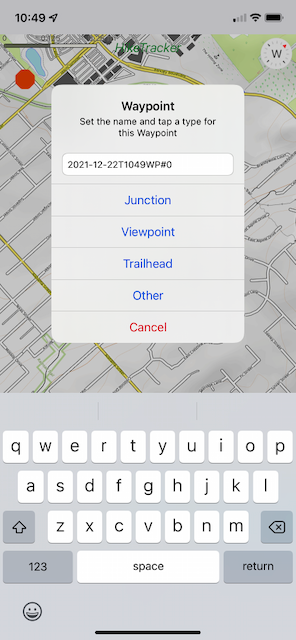
- A long press (i.e., pressing and holding for a second or two) will bring up a window for saving a Waypoint, which will be marked on the map and saved in the GPX file. You can choose from a few styles and give it a meaningful name, if you like.
Region Downloader
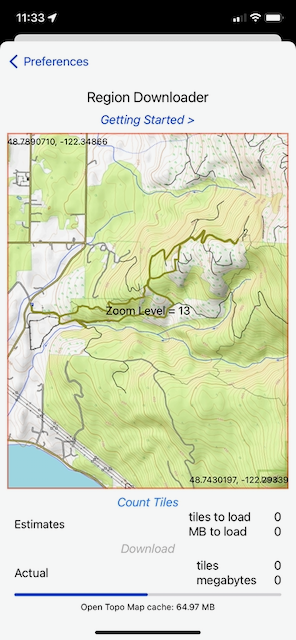
This a brand new feature that can download map tiles over wi-fi or cellular data before you leave civilization (or whatever we are calling this) and save them for use when you get to the boondocks. If you always use the app around town and have a generous cellular data allowance then you would not need this. Normally the "tiles" that comprise the maps are downloaded as they are needed and, if you leave the "Use offline map cache" in Preferences selected, will be saved in the a cache for future use.
But if you are planning to go beyond the reach of cellular service, it is nice to have some maps along for the ride.
Downloading maps is not absolutely necessary - since the GPS system functions anywhere in the world where there is an adequate view of the sky, this app will still make a good track, provide accurate distances and elevations, and draw your path on the Map Scene. It will just be lacking context.
To open the Region Downloader, go to the Control page, tap the Preferences button, scroll down to the Map Cache section and tap on the Current cache size row (which has a little "disclosure" arrow).
The "Getting Started" button in on the Downloader page displays the following instructions and other considerations:
Region Downloader Help
The Steps
- Move the map by pinching and dragging (but please, no biting or hair-pulling) until it shows the region you want.
- Tap the "Count Tiles" button to see a rough estimate of the maximum possible size of the download for the chosen region.
- If the size is reasonable, tap the "Download" button and and sit back and watch the counters tick up as the map tiles roll in.
- Go for a hike.
Elaboration on The Steps
- An efficient way to do Step 1:
- zoom way out (pinching) until your area shows
- drag it into the center of the map, and
- zoom in (unpinching) to get a tight fit.
- In Step 2:
- Be aware that, while the tiles from these servers are free of charge, someone somewhere is paying to operate the servers and other people are using them, too. So let's not be greedy.
- If your area has a shape that doesn't fit a square map snugly (perhaps it is long and skinny, say, maybe like a hiking trail) you should download it in several pieces. I try to limit each individual download to a few megabytes (MB).
- About Step 3:
- Before you start the download, be pretty sure of your selection - at present there is no graceful way to cancel it.
- Since the cache will not reload a tile, even if you ask it to, the estimales will usually be on the high side.
- And, for the same reason, don't be concerned about your downloads overlapping.
- Generally
- Map tiles are arranged in about 20 "zoom" layers, from continent-wide down to the size of a house, but this downloader only loads about 6 layers - the ones that are most useful to a hiker.
- As long as map caching is enabled in the HikeTracker Preferences, every map that you ever see on your screen, whether on the Region Downloader or on the normal map scene, is saved in the cache. So you can force any tiles on any zoom layer into the cache simply by viewing them.
- For more information about map tiles, see Tiled web map in Wikipedia.
Acknowledgement - Many thanks to Juan Merlos, the author of MapCache
Updated 2021-12-31